About JAC website multilingualization
The JAC website uses AI automatic translation (machine translation). Because it is machine translation, the translation may not always be accurate.
About the automatic translation (machine translation) function
- The website is automatically translated (machine translated) according to the language settings of the device you are using to view the website.
- To change the language, open the language selection panel from the Language button in the header and select the language.
- Some proper nouns may not be translated correctly.
- Some pages are not automatically translated. PDFs are not translated.
- Links to external sites will not be translated.
Note
- Please enable JavaScript when using this function.
- This function may not be available in some browsers or viewing environments.


We provide multilingual content through machine translation. Translation accuracy is not 100%. About the multilingualization of the JAC website
If you choose "Plain Japanese", it will be a simple sentence and a phonetic.
If you select "Attach hiragana", you will add furigana to your sentence.
You can select your native language in "Language" to translate it.
I don't understand... I'm in trouble... If that happens, please contact us.
- First, check out the Q&A!Concerns about living in Japan
Work worries Q&A - Free consultation with JAC *Only within Japan
 Weekdays 9:00-17:30 Closed on weekends and holidays
 - FITS (Foundation for International Transfer of Skills and Knowledge in Construction) is available to answer your enquiries in your native language via telephone, fax or email.

-
We provide multilingual content through machine translation. Translation accuracy is not 100%. About the multilingualization of the JAC website
If you choose "Plain Japanese", it will be a simple sentence and a phonetic.
If you select "Attach hiragana", you will add furigana to your sentence.
You can select your native language in "Language" to translate it.
Those taking the exam outside of Japan
★A blog for foreigners working in Japan★
Those taking the exam outside of Japan
Release date: 2024/11/29
When you change your smartphone (device)
If you change your smartphone, you will not be able to use the "JAC Members" app unless you apply for a device change.
When you change your smartphone model
(Device change) process
Step 1.
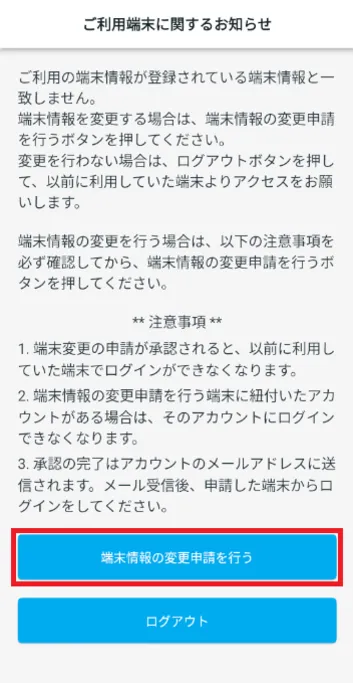
Display "Notice regarding your device"
1-1. Display the login screen
Tap the "JAC Members" icon.
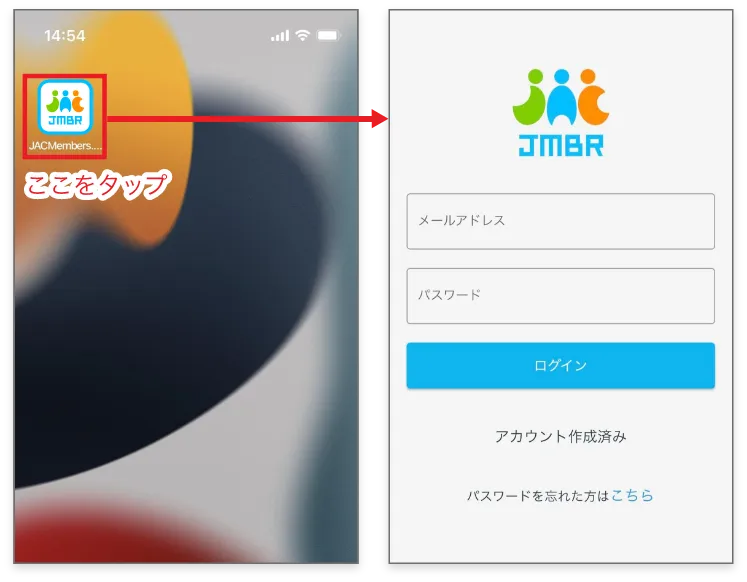
1-2. "Notice regarding your device" is displayed
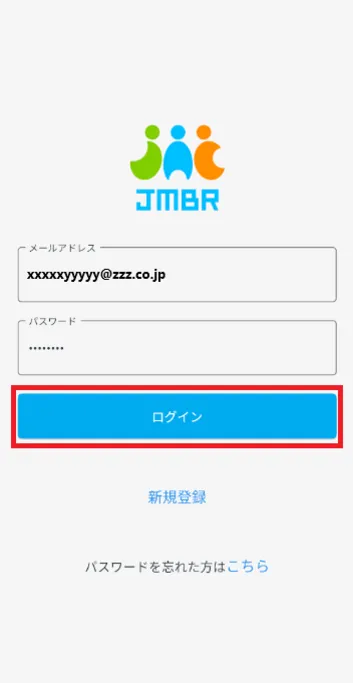
Log in with your registered email address and password.
The "Notice regarding your device" screen will be displayed.
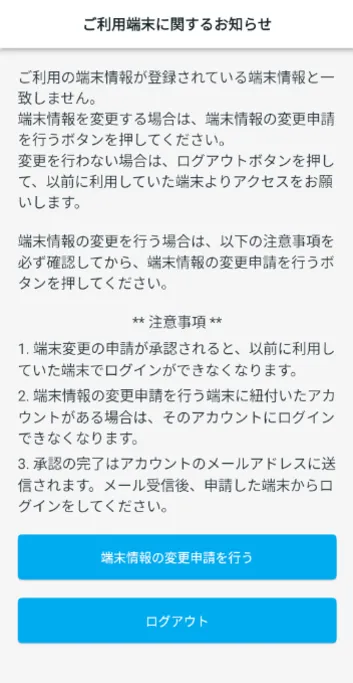
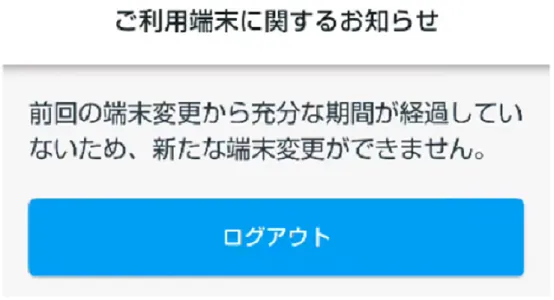
Please check
If this screen appears, you cannot change your device because enough time has not passed since you performed the steps below.
・Account approval
・Last device change
Please wait a while until you can apply for a device change.
Step 2.
Enter your name in the "Device Change Application" field
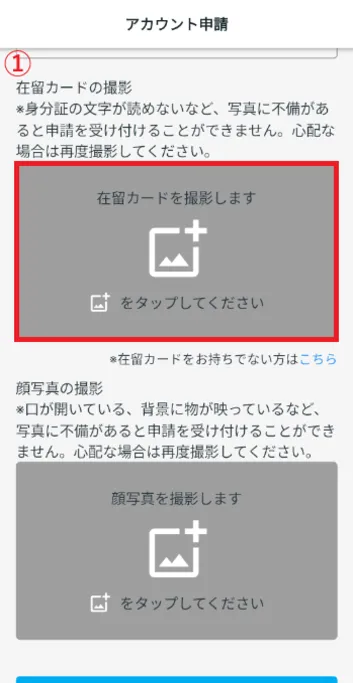
2-1. Display the "Device Change Application" screen
Tap [Apply for device change] under "Notice regarding your device."
If you are unable to apply and a dialog box appears stating "You cannot make a new application because the following applications have already been submitted," please check the frequently asked questions below.

2-2. Take a photo of your residence card
*If you do not have a residence card, please see "2-3. Taking a photo of an identification document other than your residence card."
2-3. Take a photo of an ID card other than your residence card
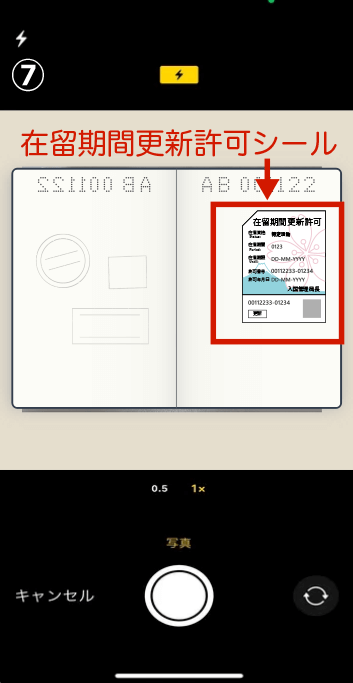
Flow of taking a photo of your residence card
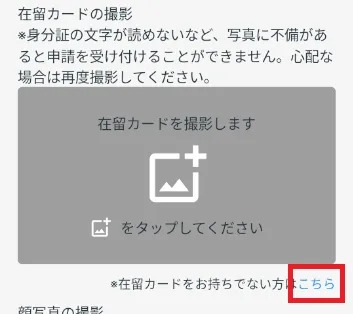
"We will take a photo of your residence card." Tap and take a photo of your residence card.
*If there are any defects in the photo, such as the characters on the ID being illegible, your application will not be accepted. If you are unsure, please take another photo.
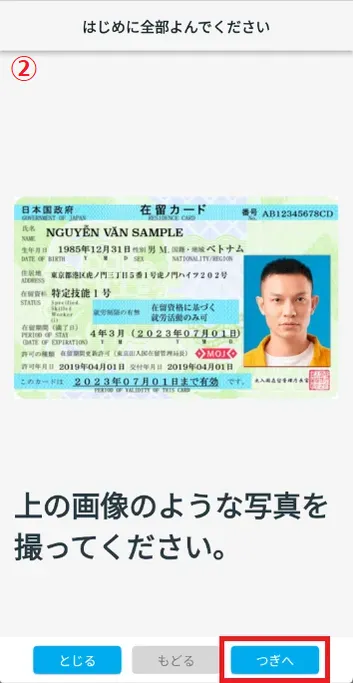
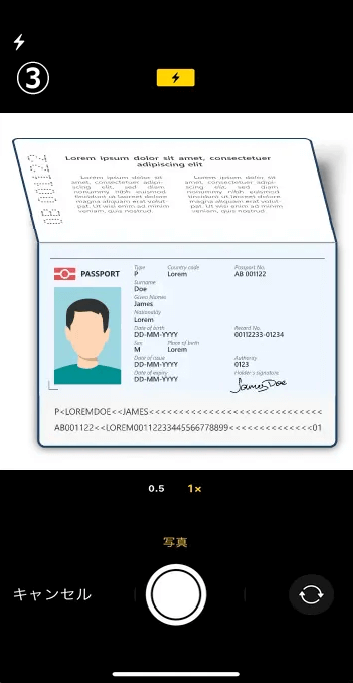
- ① Tap
- ② Check the image and tap "Next".
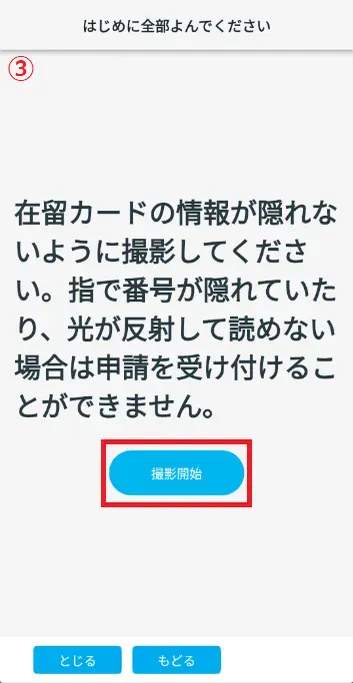
- ③ Check the warning text and tap "Start shooting."
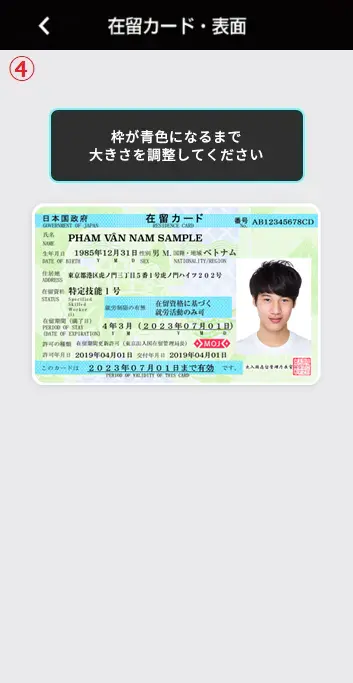
- ④ Adjust the size of your residence card and take the photo when the frame turns blue.
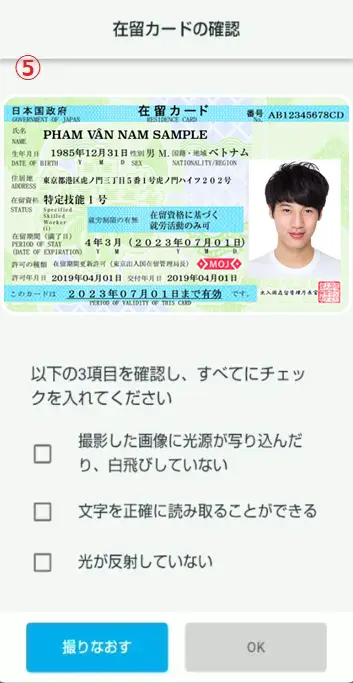
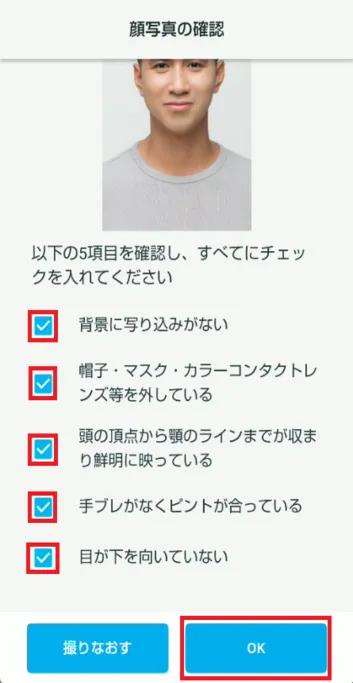
- ⑤ There are three check items to ensure that the photo of your residence card is taken correctly.
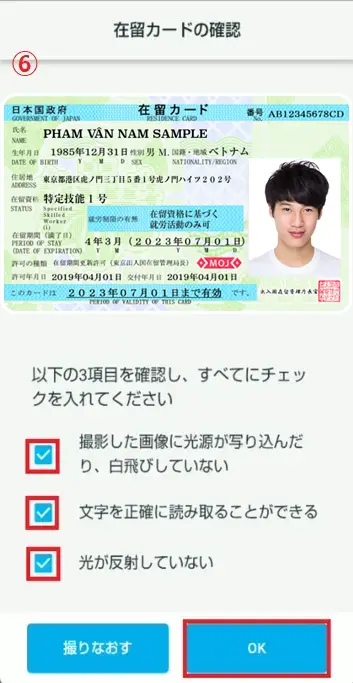
- ⑥ If you are happy with the settings, check all three boxes and tap "OK".
① Tap
② Check the image and tap "Next".
③ Check the warning text and tap "Start shooting."
④ Adjust the size of your residence card and take the photo when the frame turns blue.
⑤ There are three check items to ensure that the photo of your residence card is taken correctly.
⑥ If you are happy with the settings, check all three boxes and tap "OK".
2-3. Take a photo of an ID card other than your residence card
Under "Take a photo of your residence card," tap "Here" under "If you don't have a residence card, click here" to display the screen for using identification other than a residence card.
*If there are any defects in the photo, such as the characters on the ID being illegible, your application will not be accepted. If you are unsure, please take another photo.
*If you have taken a photo of your residence card in "2-2. Taking a photo of your ID (for those who have a residence card)", please proceed to "2-4. Taking a photo of your face" from the link below.
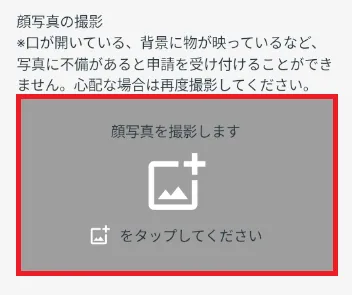
2-4. Take a photo of your face
Enter your name, date of birth, and nationality
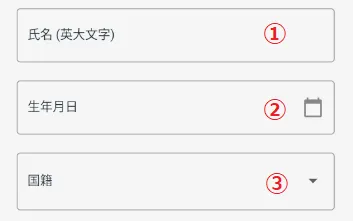
Enter your name.
Example: JOHN SMITH
Select the date of birth from the calendar that appears.
③ NationalityChoose your nationality.
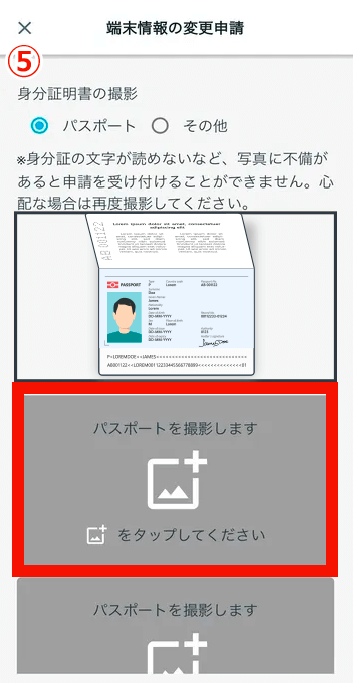
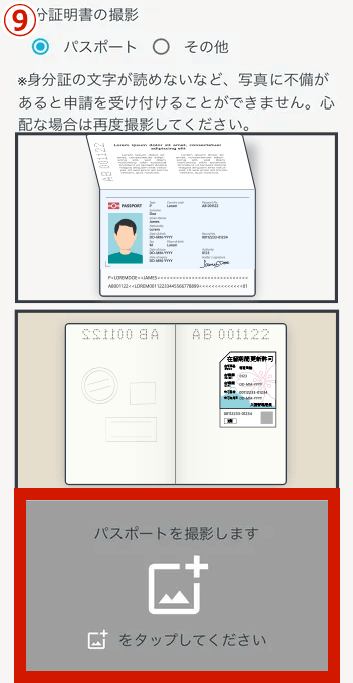
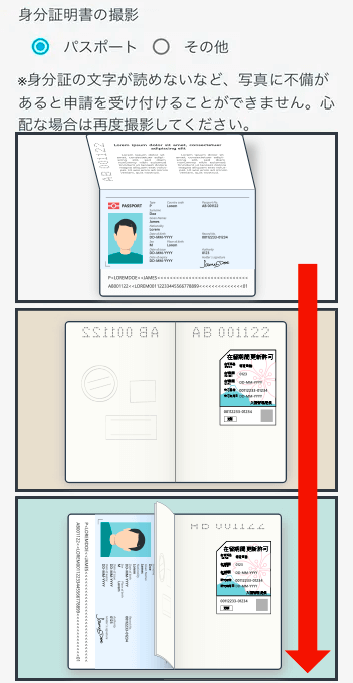
If you use a passport
Under "Take a photo of your ID" check "Passport."
"Passport photo will be taken"Tap to take a photo of your passport.
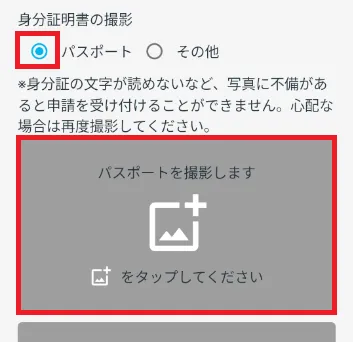

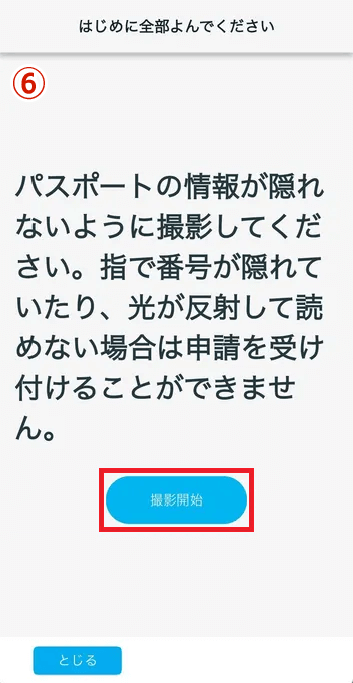
Take the following photo:
● Take photos A and B according to the instructions.
● If there is no "anamoji" on the A or B pages of your passport, you will also need to take a photo of page C.
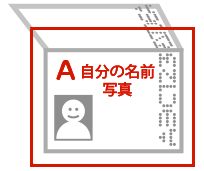
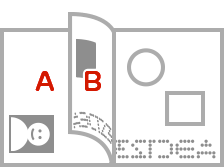
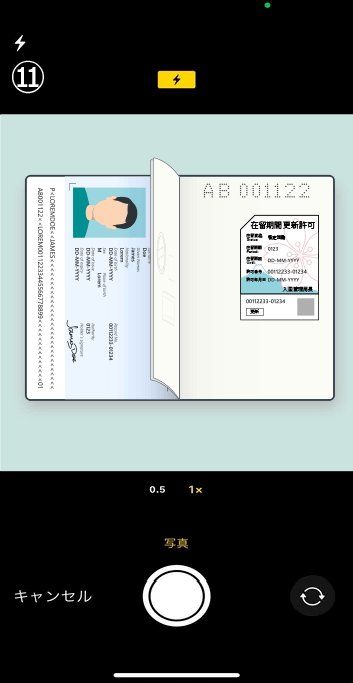
A page with your name on it
Pages with short-term visa or sticker for extension of period of stay
[For right page]
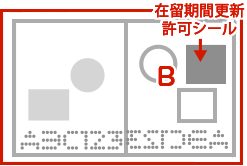
[For left page]
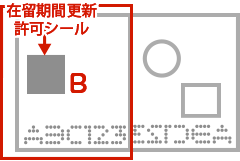
A photo showing that A and B are pages of the same passport
*If there is pseudonym on both page A and page B, photo C is not necessary.
[If B is the right page]

Take a photo of your entire passport so that pages A and B fit into one photograph.
[If B is the left page]
If pages A and B are on the left, fold the page so that the sticker on page B is visible before taking the photo.
Good photo
Bad photo
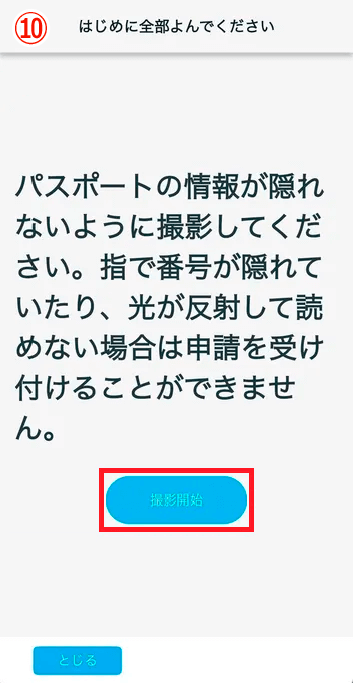
The process of taking a passport photo
Taking a photo of A
- ① The first oneTap

- ② Check the warning text and tap "Start shooting."
- ③ Take a photo of the page with your name on it.
- ④ Check the photos you have taken.
Once you have completed the check items, check them. Once you have checked all three, tap "OK."
If any of the items have not been checked, tap "Take Again" and take the photo again.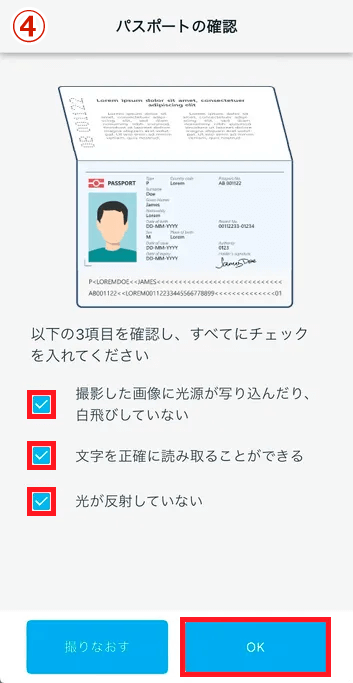
① The first oneTap
② Check the warning text and tap "Start shooting."
③ Take a photo of the page with your name on it.
④ Check the photos you have taken.
Once you have completed the check items, check them. Once you have checked all three, tap "OK."
If any of the items have not been checked, tap "Take Again" and take the photo again.
Taking a photo of B
- ⑤ SecondTap
- ⑥ Check the warning message and tap "Start shooting."
- ⑦ Take a picture of the page with "short-term visa" or "sticker for extension of period of stay" attached.
- ⑧ Check the photos you have taken.
Once you have completed the check items, check them. Once you have checked all three, tap "OK."
If any of the items have not been checked, tap "Take Again" and take the photo again.
⑤ SecondTap
⑥ Check the warning message and tap "Start shooting."
⑦ Take a picture of the page with "short-term visa" or "sticker for extension of period of stay" attached.
⑧ Check the photos you have taken.
Once you have completed the check items, check them. Once you have checked all three, tap "OK."
If any of the items have not been checked, tap "Take Again" and take the photo again.
Taking a photo of C
If there is an "anamoji" on both page A and page B, photo C is not necessary.
If you do not have an "anamoji", please take a photo that shows that A and B are the same passport.
- ⑨ The thirdTap
- ⑩ Check the warning message and tap "Start shooting."
- ⑪ Take a picture of both the page with your name and the page with "short-term visa" or "sticker for extension of period of stay" affixed to it.
- ⑫ Check the photos you took.
Once you have completed the check items, check them. Once you have checked all three, tap "OK."
If any of the items have not been checked, tap "Take Again" and take the photo again.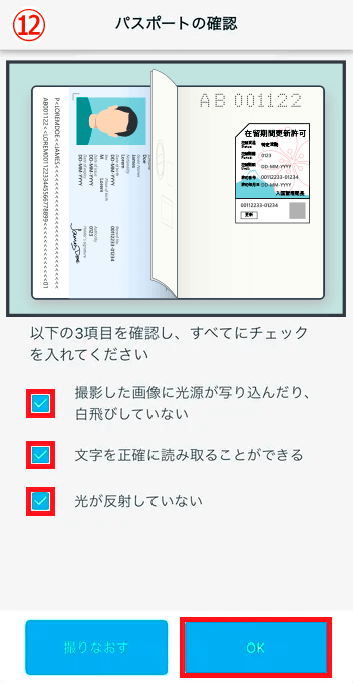
⑨ The thirdTap
⑩ Check the warning message and tap "Start shooting."
⑪ Take a picture of both the page with your name and the page with "short-term visa" or "sticker for extension of period of stay" affixed to it.
⑫ Check the photos you took.
Once you have completed the check items, check them. Once you have checked all three, tap "OK."
If any of the items have not been checked, tap "Take Again" and take the photo again.
This completes the passport photo shoot.
You will return to the first screen.
Once your photo fits in all three frames, your passport photo shoot is complete.
Tap "Next" below the three photos.
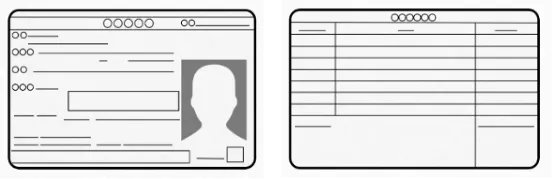
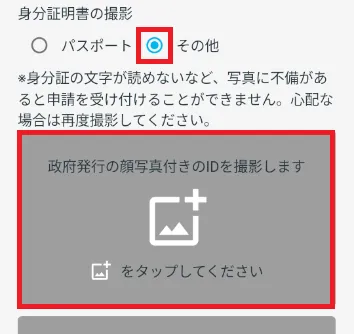
If you use other ID
Under "Photo of ID" select "Other"Tap
Take a photo of your face and the front and back of a card or other official ID.
<Government-issued identification>
- ・An ID card with a photo like a Individual Number Cards ("My Number Card") of the Japan (Resident Identification Card)
- ・Student Card
- ・Driver's License
Please refer to the "Passport photo shoot process" above for the process.
Good photo
Bad photo
2-4. Take a photo of your face
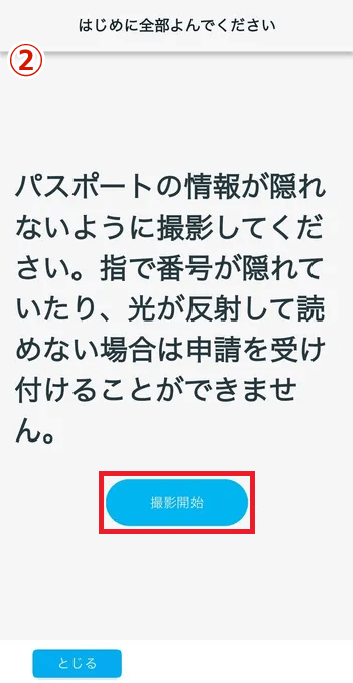
"Take a photo of your face"![]() Tap. An explanation of what you need to be careful of will be displayed. Read the explanation carefully. Tap the [Start shooting] button to take a photo.
Tap. An explanation of what you need to be careful of will be displayed. Read the explanation carefully. Tap the [Start shooting] button to take a photo.
*If there are any imperfections in the photo, such as your mouth being open or there being something in the background, your application will not be accepted. If you are unsure, please take a new photo.
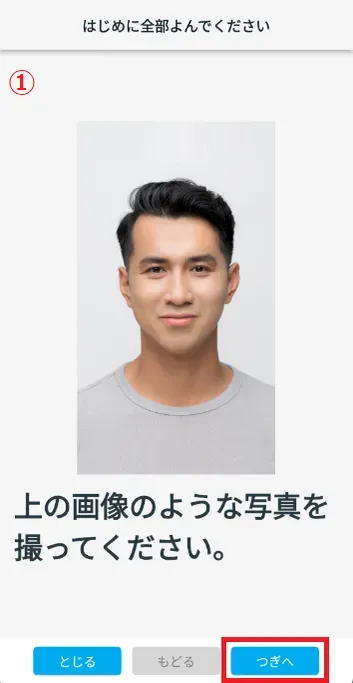
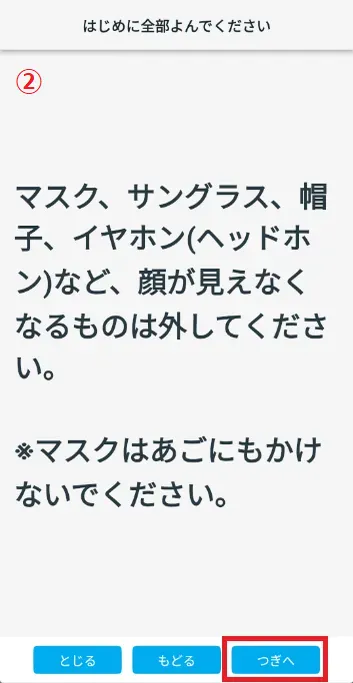
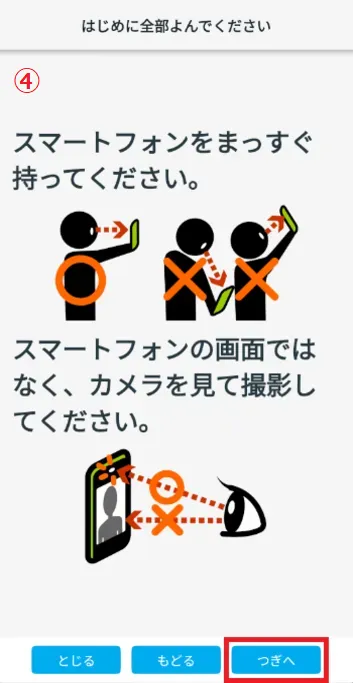
Flow of taking a face photo
(image)
- ① Check the image of the face photo you want to take and tap "Next".
- ② Check the warning text and tap "Next".
- ③ Check the warnings and images, then tap "Next."

- ④ Check the warnings and images, then tap "Next."
- ⑤ Tap "Start shooting".
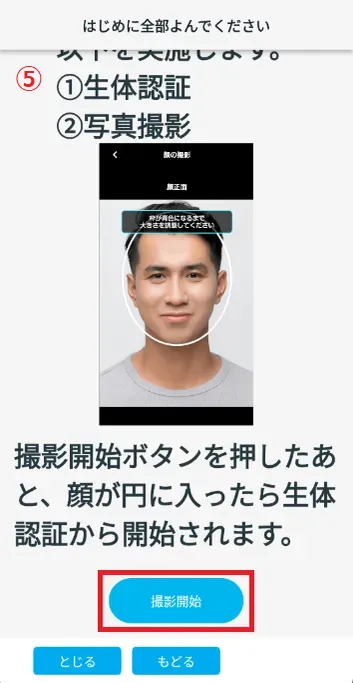
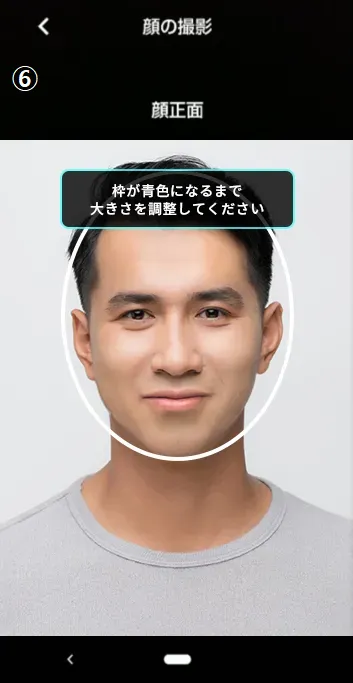
- ⑥ Move your smartphone so that your face is within the frame to perform biometric authentication.
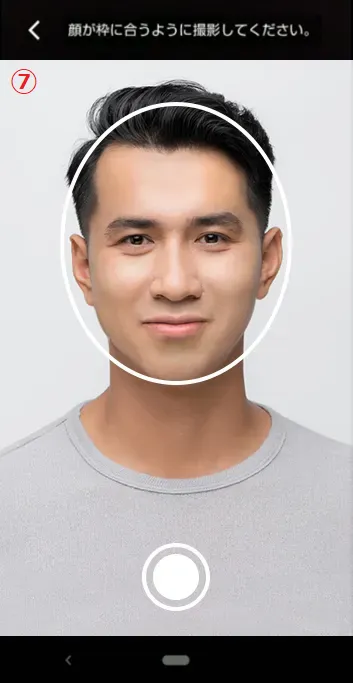
- ⑦ Tap the button to take a photo of your face.
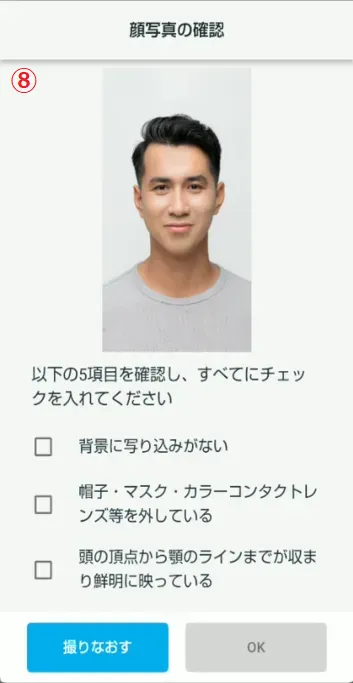
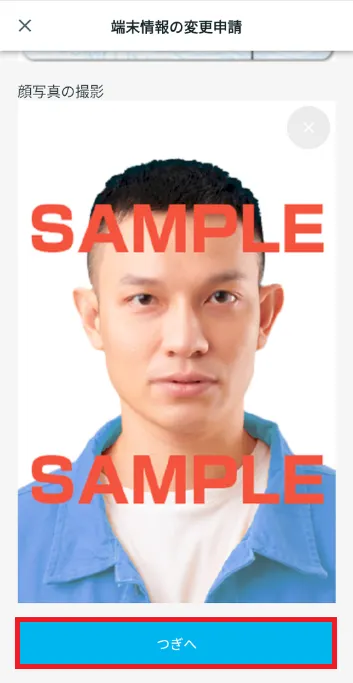
- ⑧ Refer to the sample image and check if there are any problems with the photo of your face that you have taken.
① Check the image of the face photo you want to take and tap "Next".
② Check the warning text and tap "Next".
③ Check the warnings and images, then tap "Next."
④ Check the warnings and images, then tap "Next."
⑤ Tap "Start shooting".
⑥ Move your smartphone so that your face is within the frame to perform biometric authentication.
⑦ Tap the button to take a photo of your face.
⑧ Refer to the sample image and check if there are any problems with the photo of your face that you have taken.
On the "Confirm Face Photo" screen, check that the photo is clear. If it is clear, check each item and tap the [OK] button.

Good photo
image
Bad photo
image

Photos of people wearing masks, earphones, sunglasses, etc. Glasses are good 
A photo of someone wearing a mask on their chin. 
Photos of people wearing hats or helmets. 
Out-of-focus photo 
Photos taken without clothes 
A photo of a face taken in a dark place 
Photographs with people or objects in the background 
A photo of someone with their face turned to the side.
2-5. Display the confirmation screen
Once you've entered all the information and taken a photo, tap Next.
Step 3.
Confirmation and application
3-1. Check the information you entered
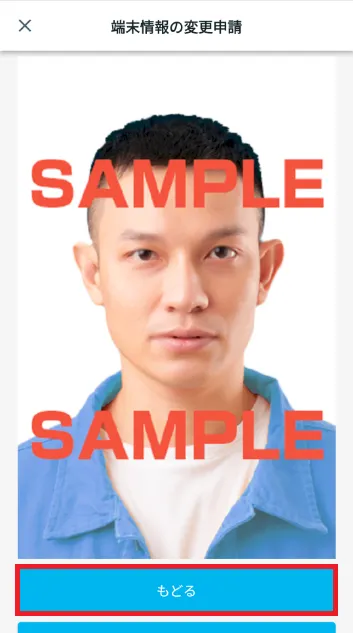
If you make a mistake, tap [Back] to return to the previous screen.
3-2. Apply
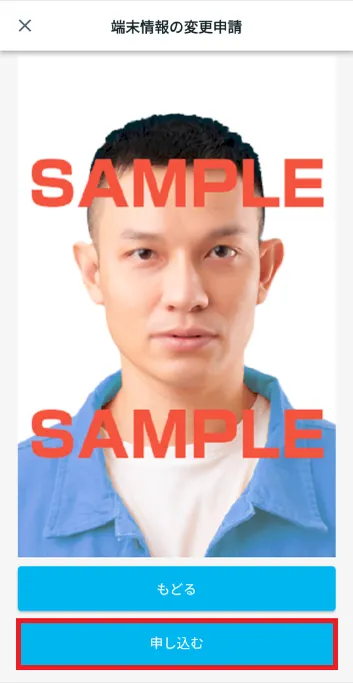
If the details are correct, tap [Apply].
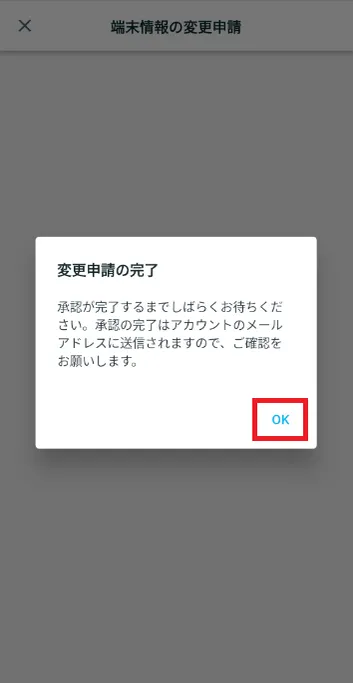
"Change request completed" will be displayed. Tap [OK]. Close the app.
If you are unable to apply and a dialog box appears stating "You cannot make a new application because the following applications have already been submitted," please check the frequently asked questions below.
Step 4.
Device change application completed
4-1. The application is approved by JAC
Once your "device change application" is approved by JAC, you will receive a message in the app.
(It may take some time for your device change request to be approved.)
Once you log in, the home screen will appear.
You cannot log in using a device you used previously.
Frequently Asked Questions (FAQ)
- I want to install the "JAC Members" app. Where can I get it?
- I forgot the password I registered for "JAC Members."
- I got a new smartphone. Can I use it as is?
- How do I send a message to JAC using the "JAC Members" app?
- I don't have a passport. I changed my smartphone, so can I apply for a change of device?
- How do I delete my account?
- How can I receive a certificate for an exam I took outside of Japan?
- How can I get a certificate of passing the exam I took in Japan?
- A "Supported version change notification" dialog box appears on the app screen. What should I do?
- What should I do if I don't know where the files I downloaded using the "JAC Members" app are saved?
- What should I do if I don't know where the files I downloaded from "My Page" are saved?
- What should I do if I am unable to submit an application and a dialog box appears stating "You cannot submit a new application because you have already applied for the following."?
Index
Account registration and basic operations
The Specified Skills Evaluation Exam Related